Creating a mobile build of my Phaser JS game - Game Devlog #23
Porting Super Ollie to mobile with virtual controls.
Written in September 9, 2021 - 🕒 5 min. readHey everyone, here we are again with another game devlog for Super Ollie, and since the game is being built with JavaScript, I can easily export it to pretty much any gaming platform, and today I’m to create a mobile build for my game.
Mobile controls
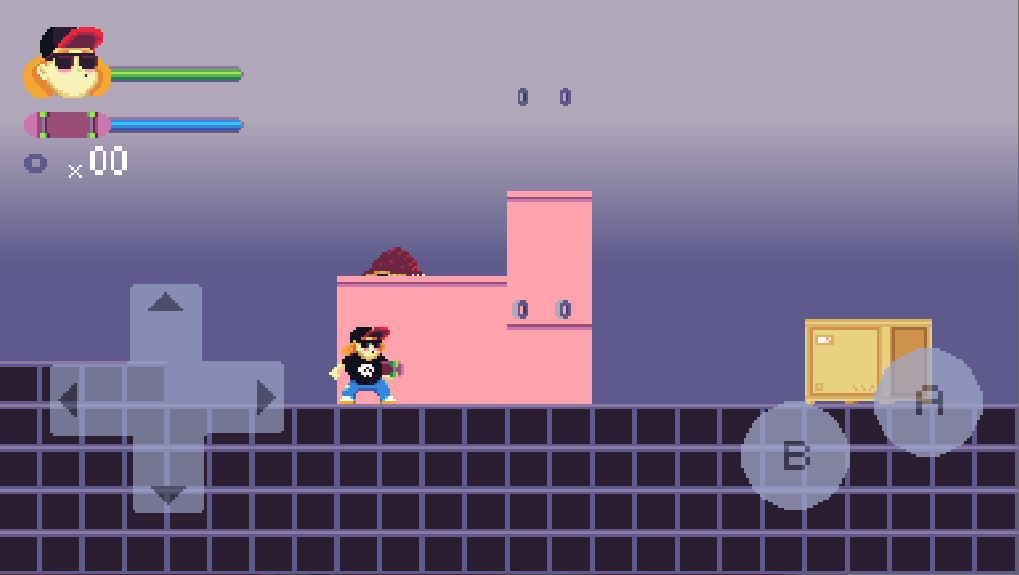
The character in my game is controlled via a gamepad or keyboard, so the easiest way to port that into a mobile version is to add virtual controller keys to the game.

To make this I will need 3 sprites for buttons, one for the A button, one for the B button, and another one for the D-buttons, like the sprite image below:

For the code, I will do pretty much the same as I did for the HUD, which is create a class and set its scroll factor to 0.
class TouchScreenControls extends GameGroup {
    constructor({
        scene,
        x = 0,
        y = 0,
        name,
        dPadAsset = 'd_pad',
        buttonAAsset = 'button_a',
        buttonBAsset = 'button_b',
        controlKeys = {},
    }) {
        const {
            LEFT,
            RIGHT,
            UP,
            DOWN,
            SPACE,
            NUMPAD_ZERO,
        } = Input.Keyboard.KeyCodes;

        const baseKeys = {
            d_pad_left: LEFT,
            d_pad_right: RIGHT,
            d_pad_up: UP,
            d_pad_down: DOWN,
            button_a: SPACE,
            button_b: NUMPAD_ZERO,
        };

        const keys = {
            ...baseKeys,
            ...controlKeys,
        };

        const children = [];
        [
            dPadAsset,
            buttonAAsset,
            buttonBAsset,
        ].forEach(this.assignButtonActions);

        super({
            scene,
            children,
            name,
        });

        this.setOrigin(0, 0);
        this.setDepth(TOUCH_CONTROLS_DEPTH);
        this.setControlsPositions();
    }
}

export default TouchScreenControls;
For the assignButtonActions function, I need to write a code that will be triggered when the player presses one of the on-screen buttons in the game, and the easiest way to do this is by simulating existing mapped keyboard keys.
For example, I already coded that when the space bar is pressed, the hero needs to jump, so all I need to do now is to create a code for when the player presses the in-screen A button, that will simulate that the space bar was pressed, and I found a really nice GitHub Gist with a function that does just that.
/**
 * source https://gist.github.com/GlauberF/d8278ce3aa592389e6e3d4e758e6a0c2
 * Simulate a key event.
 * @param {Number} keyCode The keyCode of the key to simulate
 * @param {String} type (optional) The type of event : down, up or press. The default is down
 */
export const simulateKeyEvent = (keyCode, type) => {
    const evtName = (typeof type === 'string') ? `key${type}` : 'keydown';
    const event = document.createEvent('HTMLEvents');
    event.initEvent(evtName, true, false);
    event.keyCode = keyCode;

    document.dispatchEvent(event);
};
Now for the actual assignButtonActions function code, the key here is to trigger an event for pointerdown, pointerup, and pointerout, otherwise, it will not work properly on the touchscreen.
assignButtonActions(asset) {
    if (asset === buttonPrefix + dPadAsset) {
        let angle = 0;
        ['left', 'up', 'right', 'down'].forEach((dPadDirection) => {
            const assetName = `${asset}_${dPadDirection}`;
            const child = new GameObjects.Image(
                scene,
                x,
                y,
                asset
            );
            child.setOrigin(0, 0);
            child.setName(assetName);
            child.setAngle(angle);
            child.setInteractive();

            child.on('pointerdown', () => {
                child.setTint(0x90989e);
                simulateKeyEvent(keys[assetName], 'down');
            });

            child.on('pointerup', () => {
                child.clearTint();
                simulateKeyEvent(keys[assetName], 'up');
            });

            child.on('pointerout', () => {
                child.clearTint();
                simulateKeyEvent(keys[assetName], 'up');
            });
            angle += 90;
            children.push(child);
        });
    } else {
        const child = new GameObjects.Image(
            scene,
            x,
            y,
            asset
        );
        child.setOrigin(0, 0);
        child.setName(asset);
        child.setInteractive();

        child.on('pointerdown', () => {
            child.setTint(0x90989e);
            simulateKeyEvent(keys[asset], 'down');
        });

        child.on('pointerup', () => {
            child.clearTint();
            simulateKeyEvent(keys[asset], 'up');
        });

        child.on('pointerout', () => {
            child.clearTint();
            simulateKeyEvent(keys[asset], 'up');
        });
        children.push(child);
    }
}
The setControlsPositions function is quite boring, it simply sets the position of each control button:
setControlsPositions() {
    const { width, height } = this.scene.cameras.main;
    const paddingX = 20;
    const paddingY = 60;
    this.forEach((child) => {
        const { name } = child;
        child.setX(paddingX);
        child.setY(height - paddingY);
        child.setScrollFactor(0);

        switch (name) {
            case 'big_d_pad_left': {
                child.setX(child.x);
                child.setY(child.y - 20);
                break;
            }

            case 'big_d_pad_up': {
                child.setX(child.x + 58);
                child.setY(child.y - 49);
                break;
            }

            case 'big_d_pad_right': {
                child.setX(child.x + 88);
                child.setY(child.y + 8);
                break;
            }

            case 'big_d_pad_down': {
                child.setY(child.y + 37);
                child.setX(child.x + 30);
                break;
            }

            case 'big_button_a': {
                child.setY(child.y - 25);
                child.setX(width - paddingX - 35);
                break;
            }

            case 'big_button_b': {
                child.setY(child.y - 5);
                child.setX(width - paddingX - 85);
                break;
            }

            case 'd_pad_left': {
                child.setX(child.x);
                child.setY(child.y - 20);
                break;
            }

            case 'd_pad_up': {
                child.setX(child.x + 40);
                child.setY(child.y - 40);
                break;
            }

            case 'd_pad_right': {
                child.setX(child.x + 60);
                break;
            }

            case 'd_pad_down': {
                child.setY(child.y + 20);
                child.setX(child.x + 20);
                break;
            }

            case 'button_a': {
                child.setY(child.y - 35);
                child.setX(width - paddingX - 35);
                break;
            }

            case 'button_b':
            default: {
                child.setY(child.y - 20);
                child.setX(width - paddingX - 75);
                break;
            }
        }
    });
}
Mobile build
I don’t want to load extra assets if I’m not using them, so I will create a separate build for mobile and check in my code if I should or should not load the button assets:
preload() {
    if (getGlobal('IS_MOBILE_BUILD')) {
        this.load.image('big_d_pad', bigDPad);
        this.load.image('big_button_a', bigButtonA);
        this.load.image('big_button_b', bigButtonB);
        this.load.image('big_button_Y', bigButtonY);
        this.load.image('d_pad', dPad);
        this.load.image('button_a', buttonA);
        this.load.image('button_b', buttonB);
        this.load.image('button_Y', buttonY);
    }
}

create() {
    if (getGlobal('IS_MOBILE_BUILD')) {
        this.touchScreenControls = new TouchScreenControls({
            scene: this,
            name: 'touchScreenControls',
            dPadAsset: 'd_pad',
            buttonAAsset: 'button_a',
            buttonBAsset: 'button_b',
            useBigButtons: true,
        });

        this.touchScreenControls.forEach((child) => {
            this.add.existing(child);
        });
    }
}
Then in my package.json I will create a build script with "build-mobile": "webpack --mode production --config webpack.config.prod.js --env=mobile", and on my Webpack settings by exporting a function instead of an object:
// webpack.config.js
module.exports = (env = {}) => {
    const isMobileBuild = env === 'mobile';
    if (isMobileBuild) {
        BUILD_PATH = path.resolve(__dirname, 'www/build');
        DIST_PATH = path.resolve(__dirname, 'www');
    }
}
Also, I will define the IS_MOBILE_BUILD variable with the Webpack Define Plugin:
new webpack.DefinePlugin({
    IS_MOBILE_BUILD: JSON.stringify(isMobileBuild),
})
Building an APK Bundle
I want my game to run on Android for now, and for that, I will use Cordova. First I need to install Cordova with npm install -g cordova, then install Android Studio and yada yada and then finally create my project with cordova create skate.
Cordova will expect the build files to be in a www/ folder, that’s why I had to change my Webpack script before. Now I can simply run cordova build --release android and an unsigned APK file will be generated for me.
That’s it! Easy peasy lemon squeezy!
See you in the next one!
Tags:
- coding
- games
- javascript
- phaser
- phaser 3
- game devlog
- gamedev
- skate platformer
- super ollie vs pebble corp
- webpack
- tiled
- mobile
- android
- mobile build
Related posts
Post a comment
Comments
No comments yet.


